Why would you want to sand your floor? Well, it’s chiefly done to repair damaged flooring, to change its color, to protect the floor and restore its inherent beauty from under the carpet, or to change the sheen of its finish. However, the main reason behind sanding flooring is to add a touch of beauty to wooden flooring that can easily be repaired, instead of being replaced.
Usually, flooring is sanded by professionals but some adventurous people also like to take it on as a challenging DIY project. If you want to know how to sand wood, (and it has a lot in common with how to sand furniture) it is explained below.
How to sand a wood floor
Begin this DIY project by checking out the condition of the floor. The direction of sanding will depend largely on this. If your flooring is flat, you can swipe the sander up and down on the grain of your flooring. However, for uneven floors or highly varnished ones, you need to swipe against the grain of your flooring. Start by using rough sandpaper and as you sand the floor, change over to the medium variety and finish with the fine grade.
Tools you need
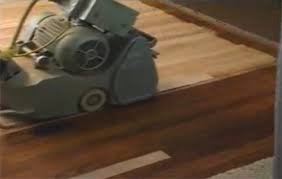
Get together three sanders—a heavy-duty one that rotates at very high speed and is covered in sandpaper; a heavy-duty sander for edging and a corner sander. The requirements for each of these sanders vary but are easily available.
Preparing the floor for sanding
- Keep the room bare of all drapes, furniture, pictures, etc. Unhinge the doors.
- Sanding throws up a lot of dust, apart from being noisy. So, it helps to wear ear and eye protectors and a respiratory mask. Take care to cover all your doors so that dust doesn’t waft all over your house. For good ventilation, work with all your windows open.
- Before you begin, ensure that no nails protrude from the floor up. Every time you change the sandpaper, remember to unplug the sander. Let it cool if some parts of its mechanism are too hot to use.
Steps on how to sand a wood floor
- Now that you’ve unplugged your sander, take off the held over strip on the sander and insert another sheet of sandpaper below it. Cover the drum with sandpaper and tie its end with the held over strip, taking care to align the cut portions using screws. The paper should be taut and positioned correctly before you can tighten the screws. This done, you’re ready to get the machine started.
- Now, run the machine diagonally across the wooden floor. You could damage your existing flooring if you stand at a right angle to it, so assume a 45⁰ Use one direction to cross the room while sanding it, then go in the opposite direction before you end up going along the wood’s grain.
- When the sander is unplugged, open the held over bolt with the bolt key. Take out the used sandpaper and set a new sheet in place. Grip the sander tightly and work at the room’s edges.
- Remove any debris that might have collected outside rather than in the dust bags of the sanders. Sweep it away, vacuum it and then wipe with a wet sponge. If certain areas are still rough to touch, sand them using sandpaper. Now, coat the floor with your choice of finish and top it up with two coats of water-based varnish. With this, you’ve just finished preparing the wood for stain, so go ahead and stain it the color you want.